Project Theta #13 How to Draw RPG Maps

Ion, one of the central cities in Antima.

Behold Ion, the city where the majority of the early game content is planned to be taking place in. After watching a helpful tutorial on how to draw your own D&D city map, I spent about 10 hours drawing the map above on an iPad. It was surprisingly not that complicated, and I decided to document the process of drawing it.

The process of drawing it

Drawing the geographical features.

The first step is to pencil out the geographical features of the area. Ion is built on a hill with a river beneath it, so I first sketched out the river, and then the hill above it. To determine the width of the river, I did a quick search on how wide rivers can be in the real world. I was surprised to find that some rivers can be more than 100 km wide! In contrast, the river beneath Ion has a mere width of 300 m.

Drawing the city boundaries.

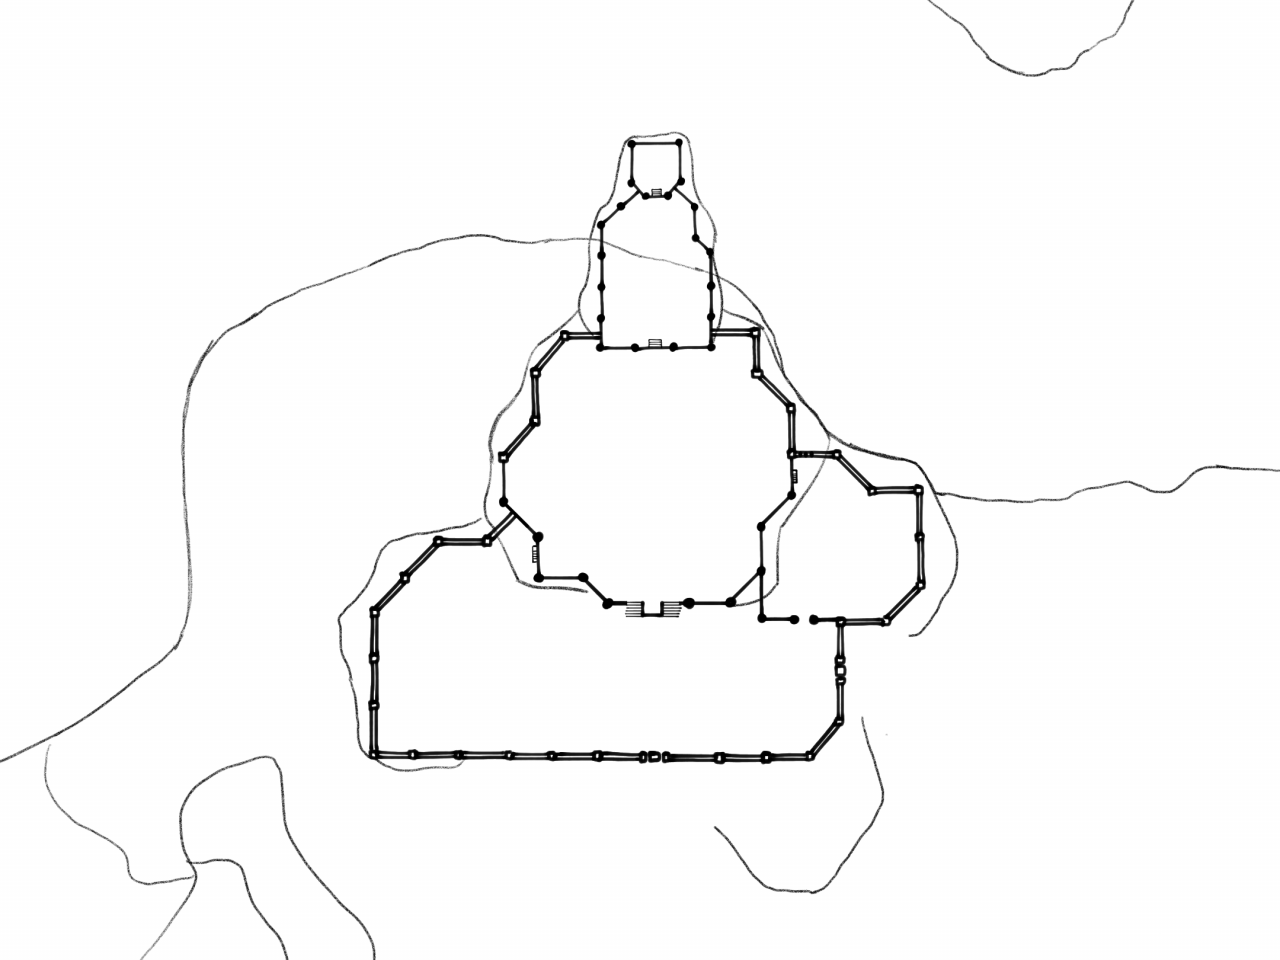
The next step is to draw the city wall. This can probably be skipped if there is no wall, but I find it very useful for planning the content. In the drawing above, I defined two types of wall – single line for low walls, and double lines for tall walls with watchtowers. The walls also roughly divide the hill into three flat areas of different heights, which is perfect for marking the social class division in the city.

Inking the geographical features.

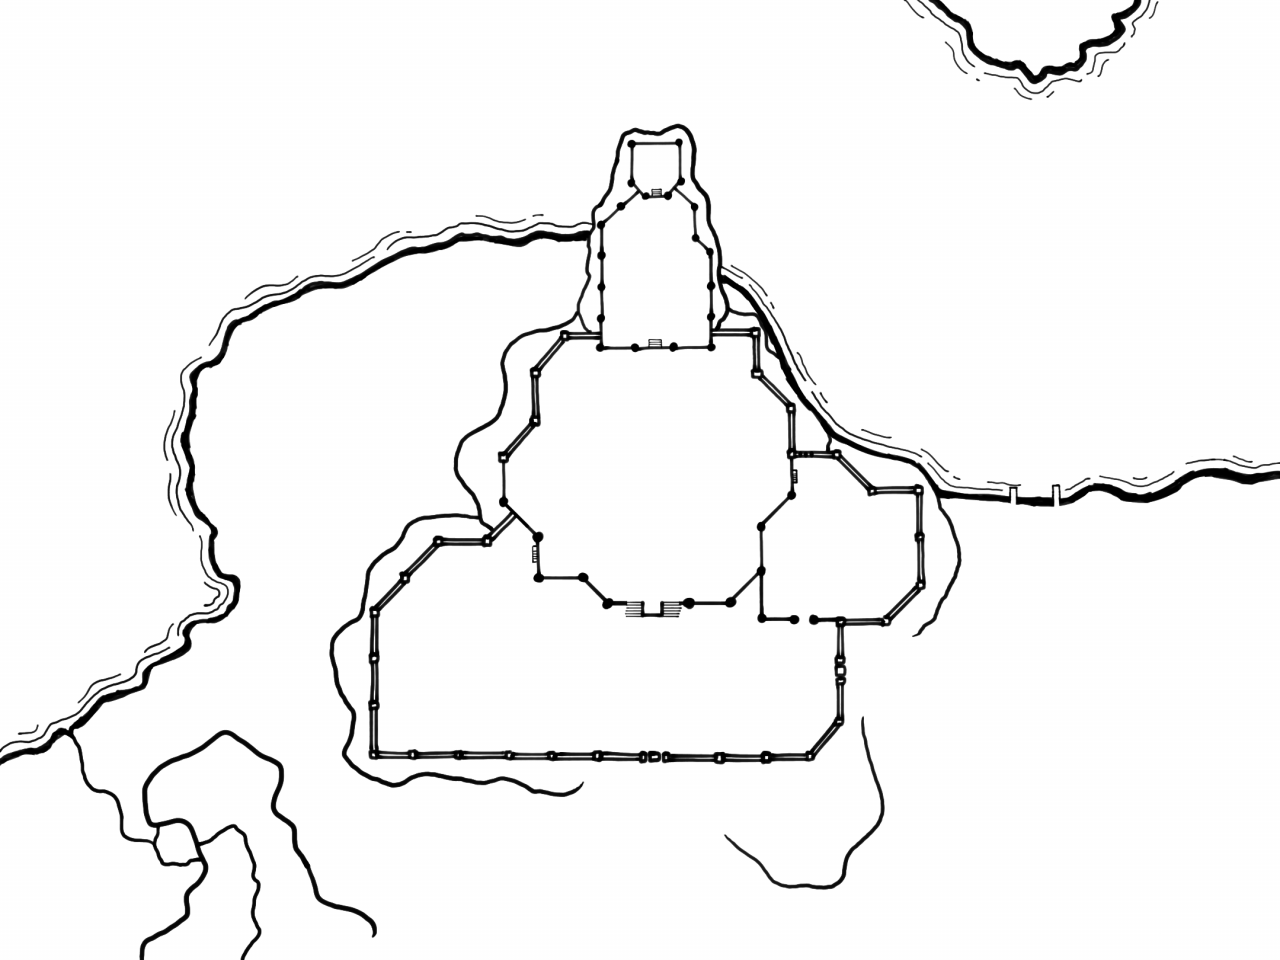
I drew over the river and hill boundaries next. This can be done later, but it made the map so much neater that I couldn’t resist. I traced the river boundary several times to create an organic variation of thickness to it, resembling the river bank.

With the pencil draft gone, it is more apparent that the city planners dug out part of the hill in order to build the wall. This isn’t apparent at first glance since the map doesn’t show height differences, but I find it interesting to imagine.

Drawing more draft!

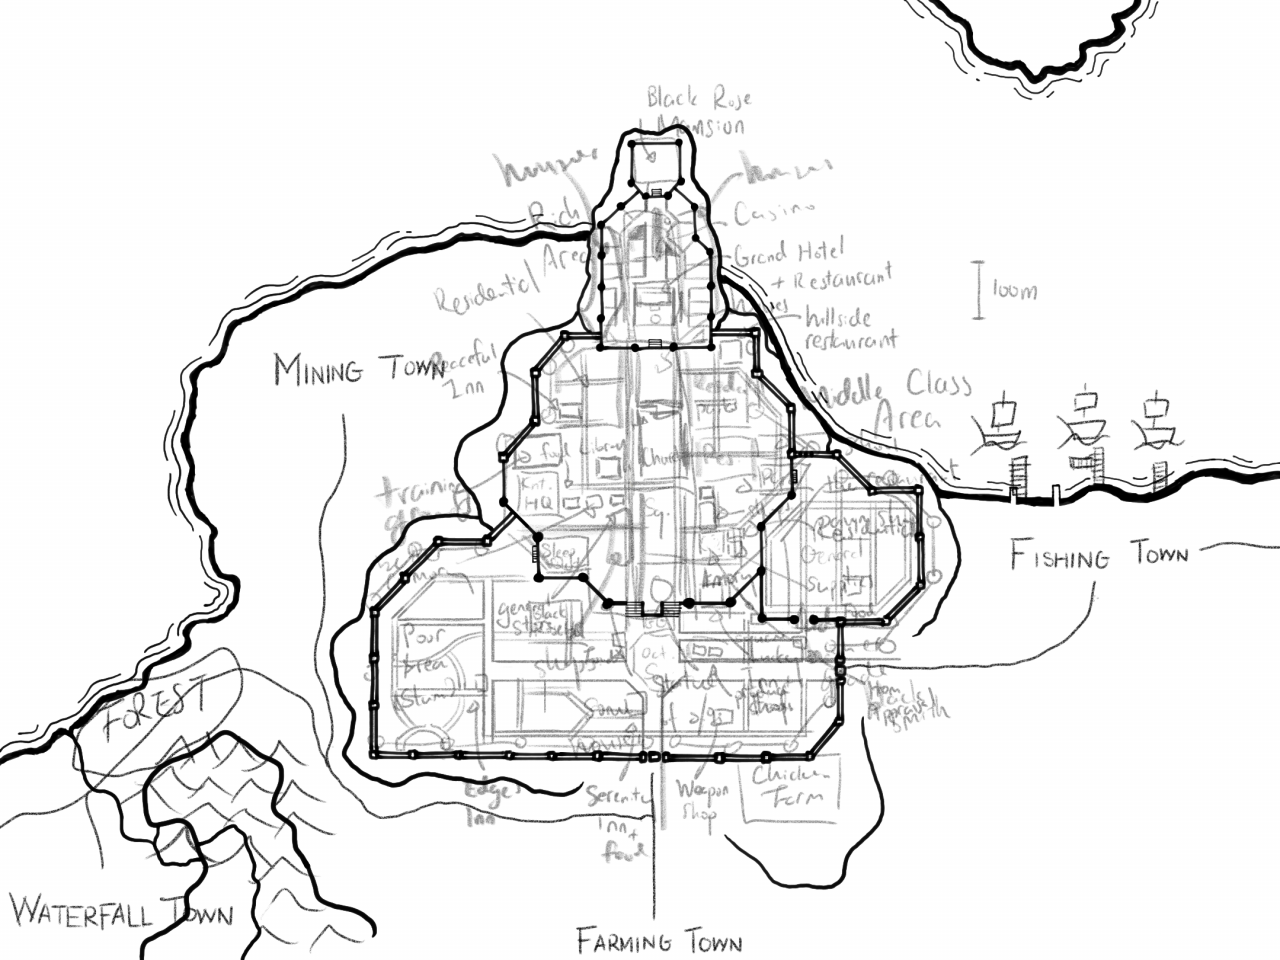
Next, I planned out the roads of the city, and marked the major landmarks. Roads can be tricky to plan out, because it really has to do with how the city is constructed. Was the city planned out from the beginning, with roads that are primarily straight and uniform? Or was it a small town, then gradually grown into a large metropolis, with seemingly zigzagging roads swirling around buildings?

I had to redraw the draft several times in order to get a mixture of both. I even came up with historic events for the different areas in the city as I progressed. In the end, I had messy, overlapping layers of text.

Drawing rectangles, lots of rectangles.

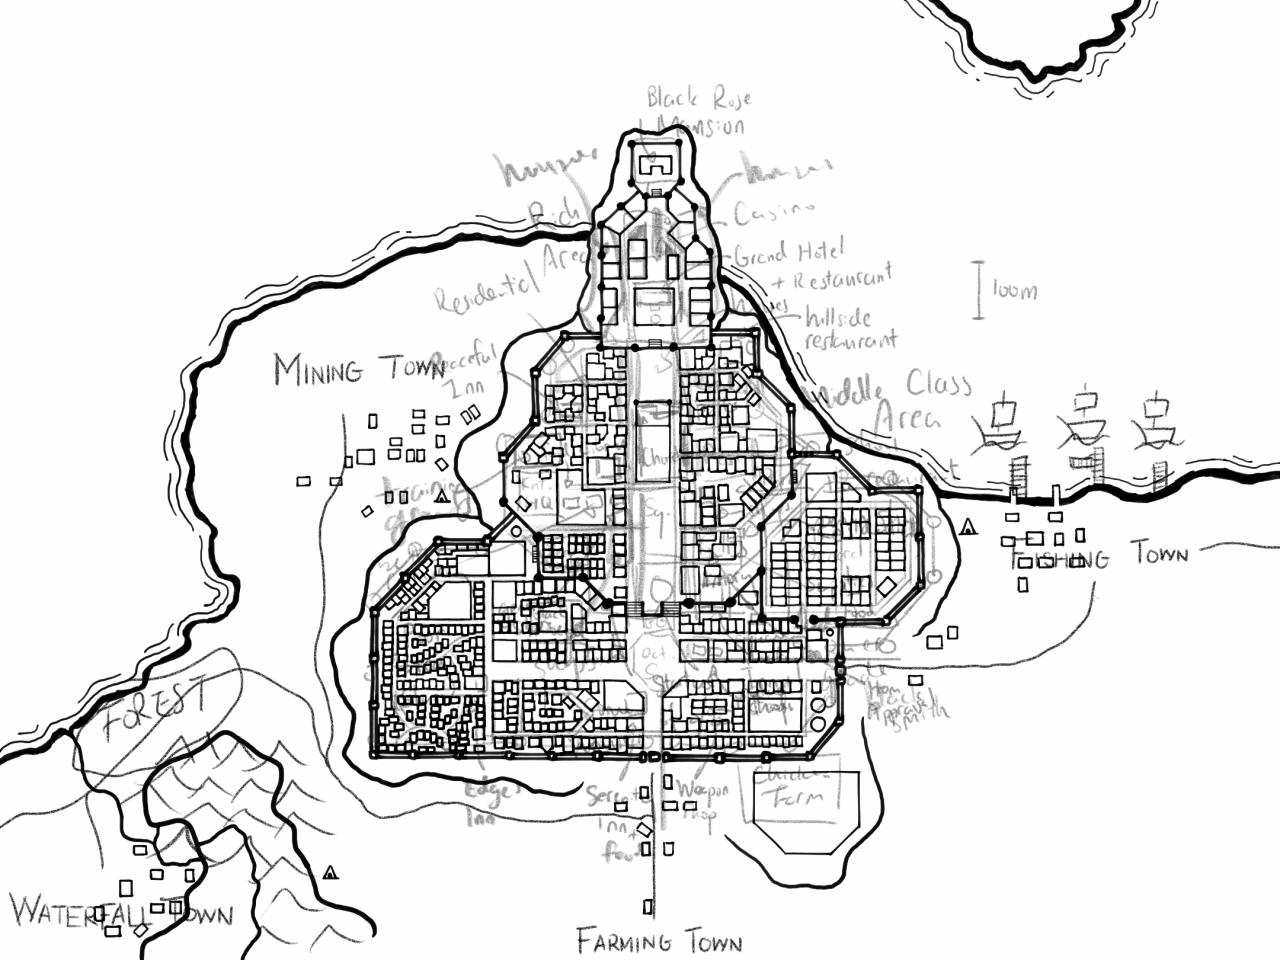
This step was the most neck-breaking part of the whole process. I drew rectangle after rectangle along the side of the roads I defined in the previous step. Sometimes I had to erase entire sections because I noticed the rectangles I drew gradually shrank in size, until it didn’t make sense as houses anymore.

I also had a limitation on what shapes and angles can the houses be in. Since we are making a 2.5D game, the houses must mostly be either horizontal or at 45-degree angle. Weirdly shaped houses will be difficult to construct in the game, so I avoided them entirely.

Erasing the draft.

Erasing the draft took two seconds: one to find the layer and one to hide it. Yay technology!

Adding details.

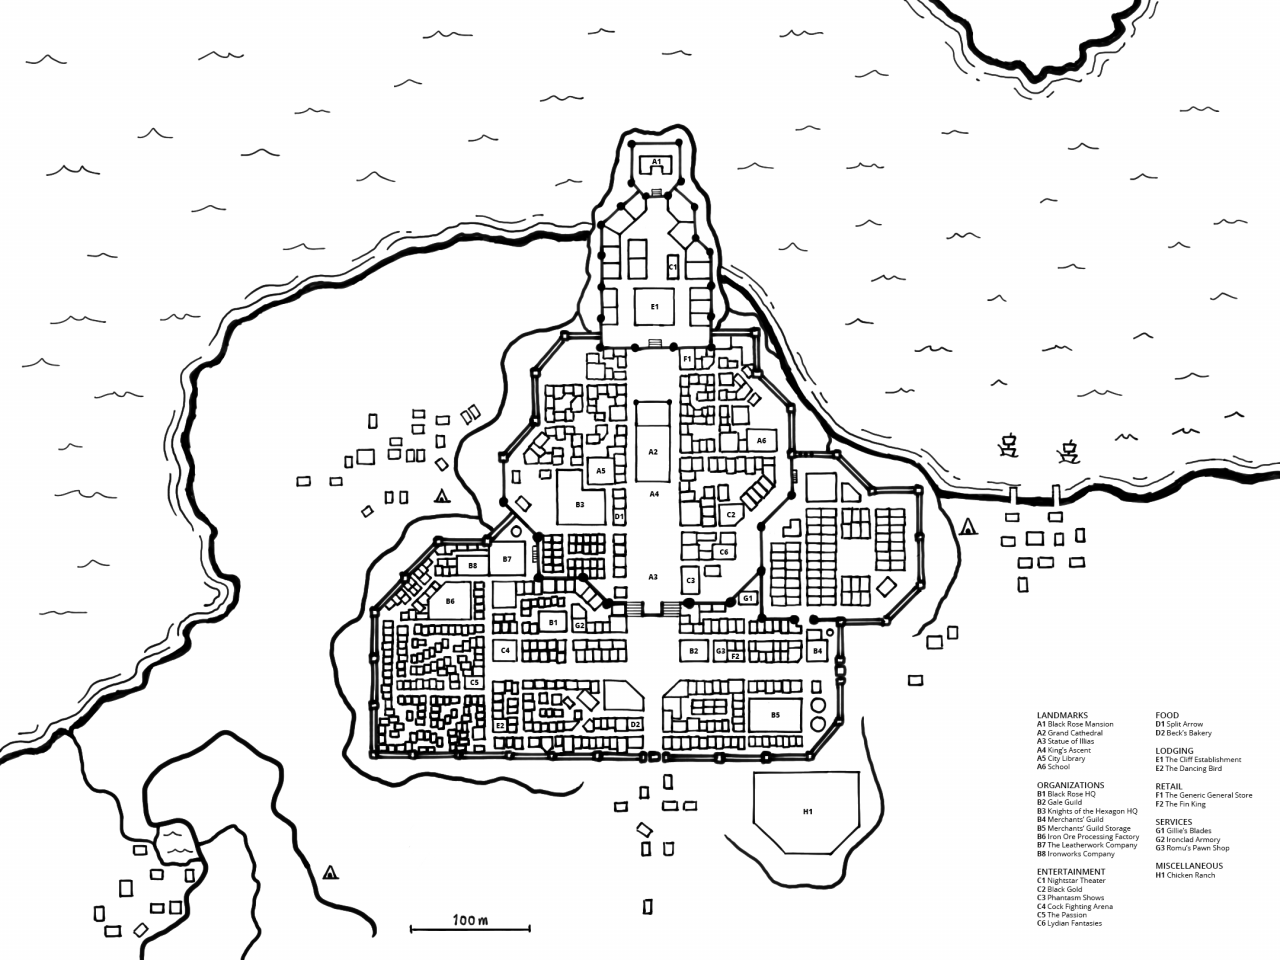
The final step was to add details to the map. I copied mostly from the tutorial, with ships, waves and caves. I also added a list of landmarks I want to focus on in the game.

An animation of the process of drawing the map of Ion.

Roadmap

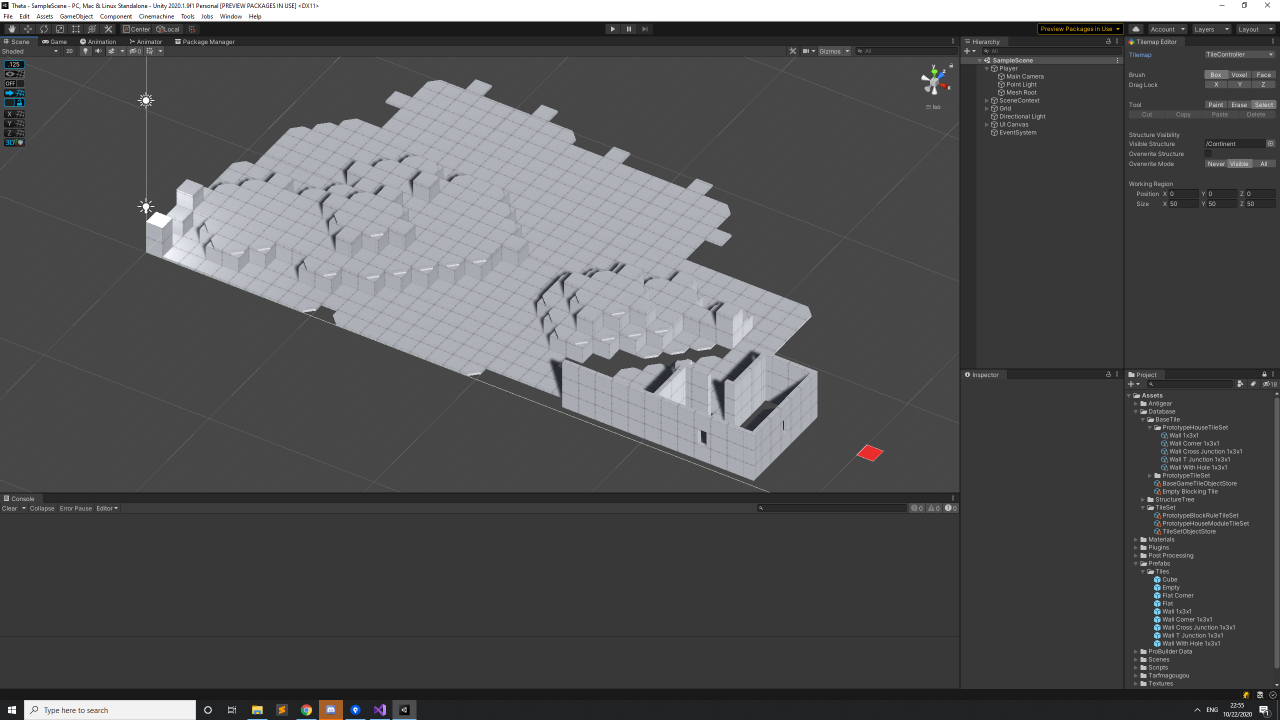
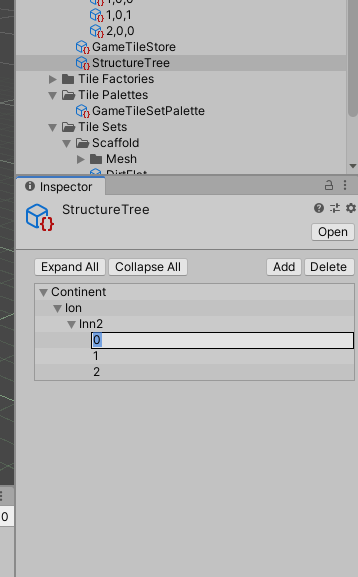
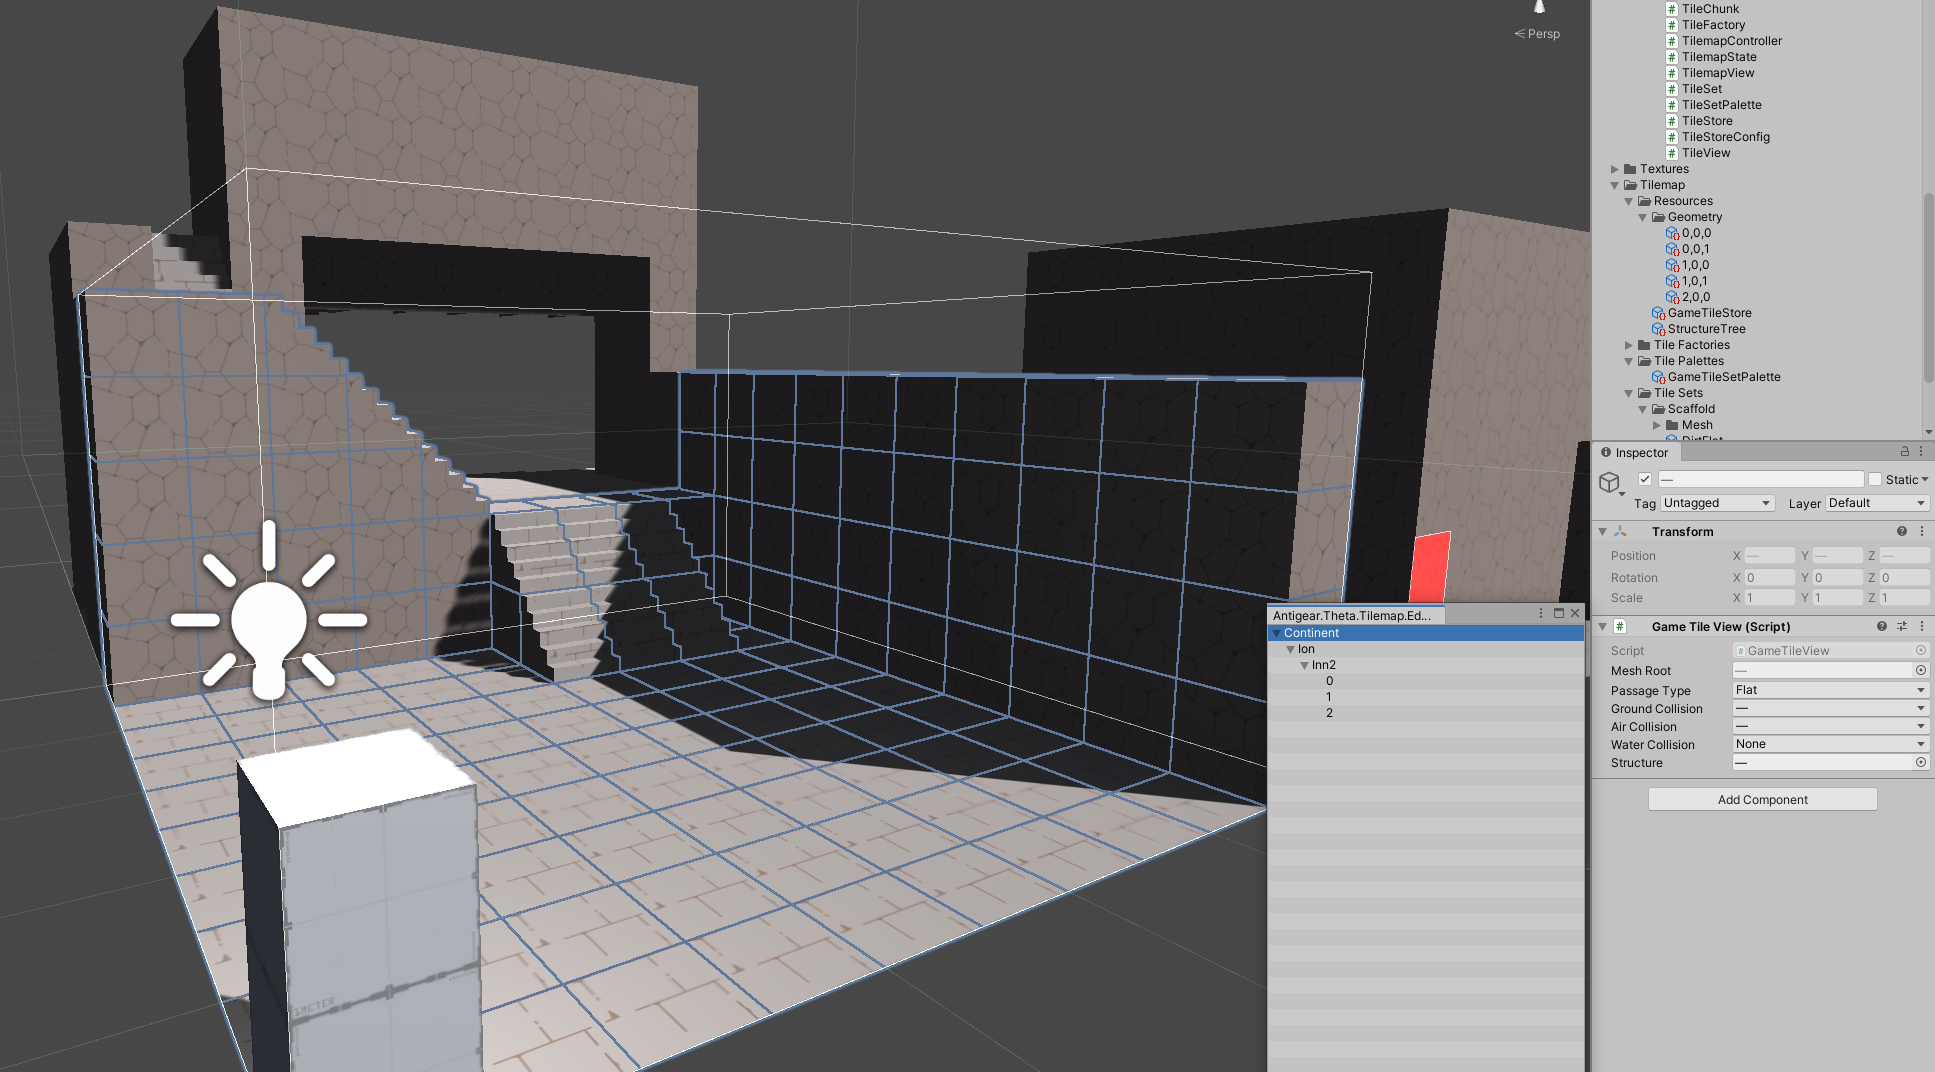
So how is the project going along? The progress is slow but steady. Now with the map in hand, our next goal to build the city in Unity with the 3D tilemap tool I wrote. I think we’ll follow the steps in how I drew the map, namely:

  • Paint the landscape
  • Build the city walls
  • Build the most important buildings

Drawing every single building on the map will take a while, but we’ll get there one step at a time.

By the time we finished with the city, I probably would be done integrating a dialog and quest system into the game.

Project Theta #12 Back From Hiatus

I was not moved when I saw ads for this game on Facebook. I was not moved when I saw articles on PCGamer and GameSpot about this game. But when I started seeing memes about Genshin Impact in multiple Facebook groups I was in, I knew I had to take a look at it. And oh my gosh it looks gorgeous.

As I explored the game, I wondered. Beneath its lustrous veneer which reportedly costed $100 million to produce, is there something I can learn from? This may come across as slightly ironic, as one of the biggest impressions people had about this game is that the game itself borrowed many elements of success from The Legend of Zelda: Breath of the Wild. Some people call it a copy on the similarities of the open world designs. But one of the reviews I read actually praised it. If you think Breath of the Wild is a great game, why wouldn’t you want more games like that?

So here I am, playing through a successful game while trying to borrow ideas from it, which in turn borrowed ideas from another successful game.

Announcements

It’s been a while since I wrote any updates. Progress on the game has mostly been slow throughout the past 9 months, but there are some exciting new developments recently. This has been enough to push me to start writing updates again.

I’ve managed to get my friend X to join the project! She offered to help after a very constructive debate session on the plot development of the game. This brings our tiny team to 3 people. X will mostly focus on creature and plant design.

Since now there are 3 people on the team, I’ve setup a Discord server for communications. This seems to be a cooler version of Slack for team chat.

Game Design

After watching a YouTube video on someone else’s journey of making a game, I was inspired to scrutinize the mechanics of Project Theta. I furiously wrote a 12-page doc analyzing popular games out there, and how Project Theta would be using mechanics from the successful ones. I came to the conclusion that I really liked the mechanics of Divinity: Original Sin II, so Project Theta will be somewhat of a grid based version of that. I especially liked how you can kill key NPCs and be left unable to progress in that game.

I’ve thought about having not only a day-night cycle, but a strict time-based event system where if you are late to a quest, you’ll fail it. However, since this kind of thing is rarely seen in games, I wonder whether this may be more detrimental to players just trying to have fun instead of enforcing a sense of event progression and urgency. I’ll have to see how it is down the road.

I should also play Divinity: Original Sin II myself. So far I’ve only based my impression on YouTube videos on it. Too bad that I just missed a sale on it. I guess I’ll play more Genshin Impact in the meantime.

Coding

After working on the game code on-and-off a couple months at a time, I finally managed to get the 3D tilemap system in a usable state. It could still use some improvements, but all the building blocks for constructing the initial town, Ion, should be there. I’ll be working with our artist Y to start importing her tile assets into the editor.

The tilemap system took well over a year to code, and I had frequently doubted whether it was worth the time investment. I don’t have to anymore, as it now covers most if not all features offered by Unity’s existing 2D tilemap system. In addition, it supports features I need for the game like:

  • Dynamic loading in chunks, to support seamless loading in an open-world game.
  • Subclassable tiles supporting attributes on each tile (e.g. custom tile collision, tile visibility settings, etc.).
  • Subclassable base tiles supporting common attributes on each type of tile (e.g. model for each tile type, so swapping out a model changes the model for all existing tiles).

I want to make a game where each tile would have some attributes attached to them in combat. For example, fire attacks are more effective when target is standing in a bush. It is just impossible to extend Unity’s built-in tilemap system to do what I want in a satisfactory way. While I don’t like how long developing this system took me, I don’t have any regrets, either.

I can probably write several posts on my adventure of developing Unity editor tools. Unity doesn’t have a lot of documentation on editor tools, and I’d like to help others avoid the holes.

Art

Y has been working on the art guidelines, for overall consistency of style in the game. It looks like the game will be going for a hand drawn, line style sort of aesthetic. Which is absolutely my favorite. Hopefully I can show them off by the next post.

Narrative

I’ve done a bit of polishing on the plot too, up to the point where the planned demo ends. I look forward to turning it into a dialog format. Will the techniques I learned from high school on how to turn a narrative into a play finally be useful? I wait with bated breath.

Project Theta #11 Visibility Trees

Why is JoJo’s Bizarre Adventure, a 30-year-old manga series, suddenly picking up so much popularity? My first time hearing it was two years ago, from a Japanese colleague in his 40’s. Merely two years later, the internet is suddenly filled with all the JoJo memes. I puzzle over this as I listen to il vento d’oro for the 50th time – and I haven’t even watched the fifth season yet!

Ahem. As I was saying, I made a lot of progress in the past two weeks. No, really.

Code

I dived back into my 3D tilemap system and tackled the visibility group problem last week. In simpler terms, when player enters house the game hides the outside world. Most 2D RPGs cheat by “teleporting” the player to a different section of the map with black tiles around the room, creating the impression that the player entered a house. This can even be done with 3D RPGs with appropriate fade in/out animations.

I don’t like cheating. I want houses to be the same scale from the outside and the inside. I don’t want player to enter a house just to find out it’s magically a lot bigger inside. In this aspect, the Witcher 3 did a great job, where they had no transitions when entering a building and modeled every single house inside & outside!

How might this be an obstacle? Unless the Witcher 3, the player’s view is mostly at a fixed angle throughout our game, like most RPGs. So we can’t adjust the camera to be at a convenient angle when the player enters a house. Instead, we have to hide the walls when that happens.

There are several ways to go about this, but surprisingly few exist that works with our 3D tilemap.

Raycast

Source: Minion’s Art (https://www.patreon.com/posts/19530112)

This method draws a line from the player’s camera to the player’s sprite, and we can find all the tiles that are in the way. With the list of tiles, we can simply not render them, or set them to translucent.

An even better way is to use a custom shader to automatically fade out tiles within some distance from the line-of-sight from player’s view to the character. I found a very interesting blog describing how this can be done. The GIF above shows the opposite effect, but it is just as easy to play around with the range and alpha value to make it so that tiles in front of the character are faded out.

This method has a major advantage in that we don’t need to do any extra work on the tilemap to make this work (apart from writing the shader). However, a major problem is that it doesn’t look great. Imagine you enter a building and all you see is the building’s facade, with a small circle of visibility around your character. It would look like this:

Source: Pokémon Ruby

Not great.

Visibility Trees

This method annotates every single tile with a tag, and shows/hides based on the player’s current position. For example, if player is on “City”, then all tiles tagged with “City” will be visible. If player now moves into “City/Inn”, then only tiles tagged with “City/Inn” will be visible.

This is a tree structure, exactly like a file system. Great, because all the knowledge I learned on operating systems might come in handy now…

(It did not.)

It turns out this is an opportune time to solve this problem, as in Unity’s latest 2019.3 release, we can now save tree in scripts efficiently with the new SerializeReferenceAttribute. Previously, to save a tree to disk in Unity, we first have to flatten it into an array (causing us to use 2x disk space – not that in this use case it’s anything worrying, but I just don’t like inefficiency).

So I created a ScriptableObject that contained my structure tree with nodes containing tag name and identifier. I then added a structureId field to each GameTile. Theoretically speaking, we now just need to toggle tile visibility around the player every time player walks, based on the structure of the current tile.

But it never is that simple.

In order for the whole thing to work, I need to have an efficient editor for the structure tree and for tagging the tiles. This turned out to be the crux of the problem. Writing custom editors in Unity is a pain.

After 20 hours, jumping through many loops, I adapted Unity’s TreeView editor control and managed to make an editor to edit the structure tree. Inside the ScriptableObject containing the tree, I keep a counter for assigning each node a unique identifier. It is crucial for the tiles to store the identifier, and not the name of the structure, so the reference is not broken when we change name.

The StructureTree editor.

The next part took longer as I tried to mimic Unity’s built-in Object picker. With multiple tiles selected, we can assign a structure tag in bulk with this picker. I couldn’t find a proper way to create this window, so instead I just made a custom EditorWindow. However, it is tricky to relay the selection back to the selected editing objects. Since Unity editor UI uses what’s called immediate mode graphical user interface (IMGUI), it doesn’t play nicely with a event-based approach. The object being edited once I select a structure tag might already have changed.

The GameTileEditor, with the StructurePickerWindow open.

I solved this with yet another identifier system. I assign a unique runtime identifier to every single tile being edited (but not persisted to disk, hence “runtime”), which will stay the same until editor reload. When the GameTileEditor opens the StructurePickerWindow, I pass in the list of runtime identifiers of the selected tiles. Once a structure tag is picked, the window writes the picked structure to a dictionary in GameTileEditor. The editor then consumes the results in the next OnInspectorGUI() update.

It was slightly more complicated as I ran around in circles trying to support multi-object editing, as it is simply impractical to tag tiles one at a time. Unity really doesn’t have great documentation when it comes down to the lesser-used details!

The result, though, is beautiful (code-wise, not art-wise):

Art

Y was occupied, but she still sketched a new character. Not exactly what I had in mind when I gave her the description, but we could always use more character portraits!

Narrative

I want to introduce the Continent, where the game will take place. I have chosen a geocentric flat-earth model, a.k.a. the Continent is flat and the Sun revolves around the Continent.

The Sun revolves around the Continent once every 24 (Earth) hours, which we call one day. In addition, the Continent self-rotates once every 360 days, which we call one year. (Technically the Continent is stationary and the sun is rotating on two axes, but that’s a lot harder to visualize.)

Sun-Continent motion.

The continent exists in space as a disk with a radius of 2,000 km, with 1,000 km of land surrounded by another 1,000 km of ocean. This makes the ocean covering 75% of the entire world, as opposed to 71% on Earth.

These traits make some highly amusing world, especially when it comes to seasons. On Earth, seasons are caused by temperature variations due to the Earth’s tilt angle causing a particular place to be closer to the Sun in the summer and farther away in the winter. On the Continent, the same thing happens because the sun is closer during…wait…

It’s not as simple as it first appears!

Expect a lot of math for the next post as I analyze exactly what the four seasons would look like on the Continent!

Project Theta #10

For the sake of studying how to create compelling narrative and quests, I’ve started playing The Witcher 3. I’ve read dozens articles on it (many of them feature the above image prominently), watched my friends sunk weeks on it, and even read all the reviews for the spinoff Netflix show (without watching the show, of course). I was once a dedicated “cloud player”, but I finally decided to blow the virtual dust off my Steam purchase made many summer-sales ago and had a go at it.

The game has paid a lot of attention to details, which I highly admire. For instance, a side quest that seemed to be a “gather X for NPC” at first turned out to be “NPC is lying, beat him up to find out why”. In turn these details imprint a deeper impression of the game world and events to the player. I have yet started designing quests for the game yet, but playing through this game will definitely impact on my storytelling and quest design down the road.

Code

After exactly three months hiatus, I finally started writing code on the game again. Yay!

RPG Maker MV

The only (custom) battle system that remotely resembles what I want in RPG Maker MV, but which will probably take more effort to write than in Unity. Source: patreon.com/lecodeMV

For the past week I considered the scope of the project and whether it is worth it to spend so much time building the game system, when I can just use RPG Maker MV instead. The latter would make a lot of the things easier, but I would have to make many compromises. I decided to investigate a bit further to see exactly what I would lose…

…and it turns out to be quite a lot! Apparently RPG Maker MV only supports the bare-bone turn-based combat. This means the time-based combat system I came up with must be thrown out of the window. That simply won’t do! I prefer spending more time but do things exactly my way instead.

I suppose I have to stick with my 3D tilemap until the end!

Object Database

I also investigated the best way to store data on abilities, items, and units. Fortunately I had a good starting point on how such a system might work, thanks to my years of experience with Warcraft III’s World Editor. It had this nice UI that made editing abilities, items and units very easy.

Unity does not have such a fancy interface built-in, unfortunately (RPG Maker does, though). Therefore I have to figure out the next best thing. After doing some research, there are several candidates: JSON, YAML, XML, and Unity’s ScriptableObject.

The first three formats are mostly the same, text-based representation of objects. A big advantage of text-based storage is that they are portable – I can easily transfer them out of Unity into, say, Google sheets for collaboration. However, there is no built-in editor for these either.

Also, text-based storage means I can’t refer to each other nicely. Say I got an item A that has ability B. I have to store the reference to ability B somehow, mostly likely its name. If I change the name of ability B to C, I have to change the reference in A as well. This is annoying to maintain.

Unity’s ScriptableObjects on the other hand supports references to other ScriptableObjects, so the referencing part is handled automatically. I can also write a custom editor (extra work) to make editing experience smoother. This is the route I decided to go for. I have a folder called Items that contains ScriptableObjects, each one a distinct Item.

The Instance Problem

I quickly ran into another problem with this route, which I will call the instance problem. Suppose we have a base class called Item, then what should an Iron Dagger be? Should it be an instance of Item, or a subclass?

At first it seems like it should be an instance. If we design the base class Item well (in which its effects are represented by a list of Abilities), then an iron dagger doesn’t require additional functionalities.

However, when we start to consider individual Iron Daggers, which has its own durability, random stats, enhancement level, accessories, then it becomes apparent that Iron Dagger should be a subclass. This becomes more apparent when we consider abilities, which has to keep track of its cooldown and current level.

We can have a million classes, one for each item. This seems like overkill and we are essentially hardcoding a database in code! I really didn’t want to go onto this path.

I ended up using a complementary class, called ItemHolder, to solve this problem. The ItemHolder will keep all data about a specific instance of an item, as well as the base item type. For example, the ItemHolder for an Iron Dagger will keep track of its durability, deviation from its base stats, and etc. Similarly, it can keep track of number of times a consumable item like healing potion can be used.

Similarly, an AbilityHolder can keep track of current cooldown and level of an ability. A unit would then have a bunch of ability and item holders instead of actual items. Problem solved.

Art

Y did a bunch of clothing design for the past month!

Narrative

I completed the portion of the story up to which I want to make a game demo out of, so I’m pausing the novel-writing for now. I might spend some time rewording and reshaping character personalities, but those would come gradually. Right now the story spans over 5,000 words, 6 main characters and 2 (story) days.

I also had a long discussion with Y on specific character personalities. I didn’t want to just borrow the usual character archetypes, but rather create nuanced characters that act in unexpected ways. This proved to be harder to achieve than I thought, even in the short two chapters!

Novel-writing aside, I would continue to write snippets here about the game setting in order to flesh out the world.

Artist Log [2] – Frozen II’s Costume Design

I went to watch Frozen II last week. Even though not quite get the story, I was really impressed by Elsa and Anna’s outfits. I particularly love Anna’s travel outfit, which is consisted of midi skirts, capes, and boot.

“Anna’s style draws inspiration from traditional Norwegian folk wear known as the bunad, a dress typically made out of wool and adorned with embroidery, and silhouettes like the cinched waist and full, A-line skirt from Christian Dior’s “New Look.” Her looks tend to be grounded in the fabrics and materials of the place and time period (the 1840s-1850s, according to Lee), which means she wears heavier materials like wool and velvet and her color palette skews on the warmer side.”

– Vox (https://www.vox.com/the-goods/2019/11/18/20970465/frozen-2-costumes-design-animate-anna-elsa)

In Frozen II Anna has grown three years older and has become more mature, which is reflected in her hairstyles and dresses. Her hair changed from pigtail braids to something less childish: half of her hair is down and a crown braid runs across the back of her head. In terms of Anna’s costume, its lines have become more straightened, and the overall color palette changed into something darker and less saturated.

The change of the cape color from bright pink to darker pink/purple is what I think the most successful. Especially when the new pink/purple color is in contrast with a touch of the gold color around her necks, it really showcases Anna’s identity as a royal princess. Besides, the less saturated pink is also a better match for her beautiful auburn hair. Compared with Frozen I, the dresses in Frozen II become shortened, therefore making it easier for the sisters to run, jump, and climb in the magic forest. Both Anna and Elsa are wearing pants and boots underneath their skirts, which is another improvement from Frozen I for their constant movements.

For Elsa, her dressing style and color is mostly inherited from the last movie. While keeping the theme color of white and light blue that remains people her magic power related to ice, the new dress has a bit more military look with the encrusted shoulders. The change is reflecting her new identity as the Queue of Arendelle.

Similarly, after Anna becomes the new Queue of Arendelle her dress also changed from last season while keeping the green color scheme.

After taking her cape and boots off, Elsa’s outfit really remains me of the costume of figure skating, and the legging makes sure she can move freely without being worried about too much exposure. Besides, there is also a lot of discussion about the fabric of Elsa’s dress, so that it could perform realistically when she is flighting with Nokk underwater.

At the end of the movie, Elsa finally reached the Ahtohallan, where her dress changed again while her understanding of her role and responsibility has changed. (And there is actually a transforming process as what you have in Sailor Moon lol ) Elsa finally got a white dress that I think everything little girl would be crazy about.

We can see the color scheme is still derived from ice, and the decorations are referring to the four elements appeared in the movie before. With the transparent white cape and the water horse, Elsa looks more like a fairy or goddess instead of a queen.

References: